本文共 9354 字,大约阅读时间需要 31 分钟。
主要参考了以下连接:
1. 主机环境与系统:
服务器:阿里云
操作系统:Ubuntu 18.04 64位
本机已经开启root权限,因此省去了执行su等命令.
2. gcc、g++编译器安装
apt-get install gccapt-get install g++apt-get install build-essentialapt-get install libtool
3. Nginx的安装和配置
3.1 使用Nginx的必备软件
PCRE库
PCRE库源码包的下载地址:
编译和安装PCRE库的相关命令:
wget https://sourceforge.net/projects/pcre/files/pcre/8.44/pcre-8.44.tar.gztar -zxvf pcre-8.44.tar.gzcd pcre-8.44/./configuremakemake install
PCRE的安装的一点小坑 在Windows10 WSL2 Ubuntu18下:
| 问题:在已经安装了PCRE库,openssl,zlib的环境中无法正常启动nginx 提示: root@DESKTOP-K82JQG5:/usr/local/nginx/sbin# ./nginx ./nginx: error while loading shared libraries: libpcre.so.1: cannot open shared object file: No such file or directory
解决方法: 首先查看依赖: root@DESKTOP-K82JQG5:/usr/local/nginx/sbin# ldd $(which /usr/local/nginx/sbin/nginx) linux-vdso.so.1 (0x00007ffd4e7c5000) libdl.so.2 => /lib/x86_64-linux-gnu/libdl.so.2 (0x00007f12d4bb3000) libpthread.so.0 => /lib/x86_64-linux-gnu/libpthread.so.0 (0x00007f12d4994000) libcrypt.so.1 => /lib/x86_64-linux-gnu/libcrypt.so.1 (0x00007f12d475c000) libpcre.so.1 => not found libz.so.1 => /usr/local/lib/libz.so.1 (0x00007f12d453e000) libc.so.6 => /lib/x86_64-linux-gnu/libc.so.6 (0x00007f12d414d000) /lib64/ld-linux-x86-64.so.2 (0x00007f12d5099000) 可以看到确实没有找到libpcre.so.1可是实际上在安装完PCRE库以后,该文件会被拷贝到/usr/local/lib/libpcre.so.1下 这时候需要修改默认的$LD_LIBRARY_PATH 执行sudo vim /etc/profile 然后在最下面添加这行:export LD_LIBRARY_PATH="/usr/local/lib":$LD_LIBRARY_PATH然后执行 source /etc/profile 再次查看可以发现已经找到了libpcre.so.1 root@DESKTOP-K82JQG5:/usr/local/nginx/sbin# source /etc/profile root@DESKTOP-K82JQG5:/usr/local/nginx/sbin# ldd $(which /usr/local/nginx/sbin/nginx) linux-vdso.so.1 (0x00007ffd163e2000) libdl.so.2 => /lib/x86_64-linux-gnu/libdl.so.2 (0x00007f406c786000) libpthread.so.0 => /lib/x86_64-linux-gnu/libpthread.so.0 (0x00007f406c567000) libcrypt.so.1 => /lib/x86_64-linux-gnu/libcrypt.so.1 (0x00007f406c32f000) libpcre.so.1 => /usr/local/lib/libpcre.so.1 (0x00007f406c111000) libz.so.1 => /usr/local/lib/libz.so.1 (0x00007f406bef3000) libc.so.6 => /lib/x86_64-linux-gnu/libc.so.6 (0x00007f406bb02000) /lib64/ld-linux-x86-64.so.2 (0x00007f406cc6c000) |
zlib库
zlib源码包下载地址:https://nchc.dl.sourceforge.net/project/libpng/zlib/1.2.11/zlib-1.2.11.tar.gz
编译和安装zlib库相关命令:
wget https://nchc.dl.sourceforge.net/project/libpng/zlib/1.2.11/zlib-1.2.11.tar.gztar -zxvf zlib-1.2.11.tar.gzcd zlib-1.2.11/./configuremakemake install
OpenSSL开发库
OpenSSL源码包下载地址:https://www.openssl.org/source/openssl-1.1.1g.tar.gz
编译和安装OpenSSL开发库的相关命令:
wget https://www.openssl.org/source/openssl-1.1.1g.tar.gztar -zxvf openssl-1.1.1g.tar.gzcd openssl-1.1.1g/./configmakemake install
3.2 Nginx的安装与启动
Nginx源码包下载地址:http://nginx.org/download/nginx-1.16.1.tar.gz
编译和安装Nginx相关命令:
wget http://nginx.org/download/nginx-1.16.1.tar.gztar -zxvf nginx-1.16.1.tar.gznginx-1.16.1/./configuremakemake install
Nginx的启动与关闭
默认情况下,nginx呗安装在/usr/local/nginx目录中:
cd usr/local/nginx ls显示:conf html logs sbin
其中,Nginx的配置文件放置于conf/nginx.conf, bin文件是位于sbin目录下的nginx文件。
1)默认方式启动Nginx服务器
/usr/local/nginx/sbin/nginx
这时候会读取配置文件:/usr/local/nginx/conf/nginx.conf
2)查看nginx进程
ps -ef|grep nginx

可以通过浏览器直接访问此机器的IP,如果出现Welcome to nginx!表明Nginx已经安装并运行成功:

3)可以指定ngxin的配置文件并启动服务
# /usr/local/nginx/sbin/nginx -c /usr/local/nginx/conf/nginx.conf
4)测试配置信息
# /usr/local/nginx/sbin/nginx -t

4 FastDFS安装与配置
版本:
libfastcommon 1.0.50
fastdfs 6.0.7
4.1 安装 libfastcommon
libfastcommon的git下载地址:
安装fastdfs之前,需要先安装libfastcommon
git clone https://github.com/happyfish100/libfastcommon.gitcd libfastcommongit checkout V1.0.50 ./make.sh ./make.sh install
4.2 安装FastDFS
git clone https://github.com/happyfish100/fastdfs.gitcd fastdfsgit checkout V6.07./make.sh && ./make.sh install
关于fastdfs的架构参考这篇文章:
4.3 配置Tracker
# 创建 Tracker 的存储日志和数据的根目录mkdir -p /home/fastdfs/trackercd /etc/fdfscp tracker.conf.sample tracker.conf# 配置 tracker.confvim tracker.conf
在这里,tracker.conf 只是修改以下Tracker存储日志和数据的路径,主要修改base_path路径
# 启用配置文件(默认为 false,表示启用配置文件)disabled=false# Tracker 服务端口(默认为 22122)port=22122# 存储日志和数据的根目录base_path=/home/fastdfs/tracker

4.4 配置Storage
# 创建 Storage 的存储日志和数据的根目录mkdir -p /home/fastdfs/storagecd /etc/fdfscp storage.conf.sample storage.conf# 配置 storage.confvim storage.conf
这里storage.conf只是修改以下storage存储日志和数据的路径
# 启用配置文件(默认为 false,表示启用配置文件)disabled=false# Storage 服务端口(默认为 23000)port=23000# 数据和日志文件存储根目录base_path=/home/fastdfs/storage# 存储路径,访问时路径为 M00# store_path1 则为 M01,以此递增到 M99(如果配置了多个存储目录的话,这里只指定 1 个)store_path0=/home/fastdfs/storage# Tracker 服务器 IP 地址和端口,单机搭建时也不要写 127.0.0.1# tracker_server 可以多次出现,如果有多个,则配置多个tracker_server = 118.31.8.xxx:22122 # 这里修改成自己的主机IP# 设置 HTTP 访问文件的端口。这个配置已经不用配置了,配置了也没什么用# 这也是为何 Storage 服务器需要 Nginx 来提供 HTTP 访问的原因http.server_port=8888
主要修改:base_path、store_path0、tracker_server
4.5 启动Tracker和Storage服务
# 启动 Tracker 服务# 其它操作则把 start 改为 stop、restart、reload、status 即可。Storage 服务相同/etc/init.d/fdfs_trackerd start# 启动 Storage 服务/etc/init.d/fdfs_storaged start# 可以通过 fdfs_monitor 查看集群的情况# 查看 Storage 是否已经注册到 Tracker 服务器中# 当查看到 ip_addr = 120.27.131.197 (localhost.localdomain) ACTIVE# ACTIVE 表示成功/usr/bin/fdfs_monitor /etc/fdfs/storage.conf
通过以下命令可以查看storage服务是否已经添加到tracker服务中

4.6 测试上传文件
# 修改 Tracker 服务器客户端配置文件cp /etc/fdfs/client.conf.sample /etc/fdfs/client.confvim /etc/fdfs/client.conf
client.conf 中修改 base_path 和 Tracker 服务器的 IP 地址与端口号即可
# 存储日志文件的基本路径base_path=/home/fastdfs/tracker# Tracker 服务器 IP 地址与端口号tracker_server = 118.31.8.112:22122
主要修改base_path和tracker_server
测试上传文件:
root@iZbp1dljn9u61nxzsa4r3mZ:~# /usr/bin/fdfs_upload_file /etc/fdfs/client.conf ./test.txtgroup1/M00/00/00/dh8IcGC8jB-ASA6kAAAADc5qlig067.txt
当返回文件ID号,比如group1/M00/00/00/xxxxxxx.txt则表示上传成功
如果报错:tracker_query_storage fail, error no: 2, error info: No such file or directory,一般都是因为路径没有设置对。可以
tail -f /home/fastdfs/storage/logs/storaged.log
查看日志
4.7 下载文件测试
查看文件路径
在client所在的机器完成下载,删除测试
下载:
root@iZbp1dljn9u61nxzsa4r3mZ:~/test# /usr/bin/fdfs_download_file /etc/fdfs/client.conf group1/M00/00/00/dh8IcGC8jB-ASA6kAAAADc5qlig067.txtroot@iZbp1dljn9u61nxzsa4r3mZ:~/test# lsdh8IcGC8jB-ASA6kAAAADc5qlig067.txtroot@iZbp1dljn9u61nxzsa4r3mZ:~/test#
删除:
root@iZbp1dljn9u61nxzsa4r3mZ:~/test# /usr/bin/fdfs_delete_file /etc/fdfs/client.conf group1/M00/00/00/dh8IcGC8jB-ASA6kAAAADc5qlig067.txtroot@iZbp1dljn9u61nxzsa4r3mZ:~/test# ls /home/fastdfs/storage/data/00/00root@iZbp1dljn9u61nxzsa4r3mZ:~/test#
可以看到目录为空,文件已经被删除。
以上则完成了fastdfs的安装与配置,可以使用api来完成文件的上传,同步和下载。
接下来还会安装Nginx,目的如下:
* Storage安装Nginx, 为了提供http的访问和下载服务,同时解决group中Storage服务器的同步延迟问题
* Tracker安装Nginx, 主要是为了提供http访问的方向代里、负载均衡以及缓存服务
5 fastdfs-nginx-module安装
5.1 模块包的安装
注意:全部安装条件在确保之前的FastDFS的tracker、storage和client可以正常使用。
模块包源码包本地下载路径:
5.1.1 下载fastdfs-nginx-module
git clone https://github.com/happyfish100/fastdfs-nginx-module.gitcd fastdfs-nginx-modulegit checkout V1.22
cd fastdfs-nginx-module/ 会发现里面有个INSTALL和src目录,这个不需要make而是需要重新编译以下storage的Nginx模块
5.1.2 查看fastdfs-nginx-module模块src路径
root@iZbp1dljn9u61nxzsa4r3mZ:~/packages/fastdfs-nginx-module# pwd/root/packages/fastdfs-nginx-module
5.1.3 安装和编译Nginx并添加FastDFS模块
#进入到nginx源码目录cd nginx-1.16.1/ (本人路径:/root/packages/nginx-1.16.1)./configure --add-module=/root/packages/fastdfs-nginx-module/src
其中/root/packages/fastdfs-nginx-module/src是刚才下载的
fastdfs_nginx_module模块的绝对路径,就是在编译Nginx时候,联通这个模块一起编译。
出现以下信息则表示添加成功:

5.1.4 给Nginx目录下的objs/Makefile文件中增加头文件目录
vim objs/Makefile
添加
ALL_INCS = -I src/core \ -I /usr/include/fastdfs \ -I /usr/include/fastcommon \ -I src/event \ -I src/event/modules \

特别要注意加入两行 后 -I 和 \ 的颜色要和原来一致,否则报错:
Makefile:8: recipe for target 'build' failedmake: *** [build] Error 2
5.1.5 重新编译及安装nginx
关闭所有nginx服务

接着编译
makemake install
5.2 fastdfs-nginx-module的配置
5.2.1 fastdfs-nginx-module配置文件
切换到fastdfs-nginx-module/src路径
root@iZbp1dljn9u61nxzsa4r3mZ:~/packages/fastdfs-nginx-module/src# pwd/root/packages/fastdfs-nginx-module/srcroot@iZbp1dljn9u61nxzsa4r3mZ:~/packages/fastdfs-nginx-module/src# lscommon.c common.h config mod_fastdfs.conf ngx_http_fastdfs_module.c
将fastdfs-nginx-module/src/mod_fastdfs.conf 拷贝到/etc/fdfs/下:
cp mod_fastdfs.conf /etc/fdfs/
fastdfs-nginx-module 和 FastDFS 配置文件修改# 复制 FastDFS 的部分配置文件到 /etc/fdfs
cd /root/0voice/cloud-drive/fastdfs
cp conf/http.conf /etc/fdfs/
cp conf/mime.types /etc/fdfs/
修改vim /etc/fdfs/mod_fastdfs.conf
# Tracker 服务器IP和端口修改tracker_server=120.27.131.197:22122# url 中是否包含 group 名称,改为 true,包含 groupurl_have_group_name = true# 配置 Storage 信息,修改 store_path0 的信息store_path0=/home/fastdfs/storage# 其它的一般默认即可,例如base_path=/tmpgroup_name=group1 storage_server_port=23000 store_path_count=1
主要修改tracker_server、url_have_group_name、store_path0。
5.2.2 配置nginx
vim /usr/local/nginx/conf/nginx.conf
配置nginx支持group0-group9, 以及M00-M99,以便后续扩容
location ~/group([0-9])/M([0-9])([0-9]) { ngx_fastdfs_module;} 
5.2.3 重启nginx
配置完fastdfs-nginx-module后需要重启nginx
/usr/local/nginx/sbin/nginx -s reload
如果出现如下错误。需要先停止nginx再启动nginx
/usr/local/nginx/sbin/nginx -c /usr/local/nginx/conf/nginx.conf
nginx: [emerg] unknown directive "ngx_fastdfs_module" in /usr/local/nginx/conf/nginx.conf:92
5.2.4 测试环境
服务器中测试上传
root@iZbp1dljn9u61nxzsa4r3mZ:~# touch test.txtroot@iZbp1dljn9u61nxzsa4r3mZ:~# echo "You are not strong, no one brave for you" > test.txtroot@iZbp1dljn9u61nxzsa4r3mZ:~# fdfs_upload_file /etc/fdfs/client.conf test.txtgroup1/M00/00/00/dh8IcGC8l7yAArNnAAAAKTIQHvk523.txtroot@iZbp1dljn9u61nxzsa4r3mZ:~#
接着在浏览器中输入:
http://118.31.8.112:80/group1/M00/00/00/dh8IcGC8l7yAArNnAAAAKTIQHvk523.txt
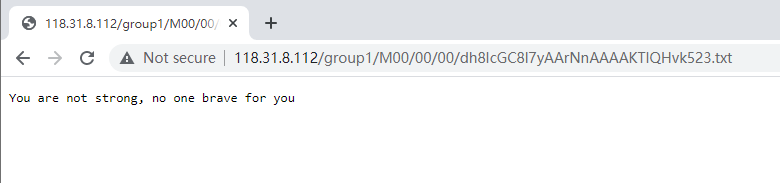
测试成功
转载地址:http://pwwci.baihongyu.com/